NERVE TESTING
SFN
Small Fiber Neuropathy is often an undiagnosed disease and the only way to DEFINITIVELY diagnose it is by taking a skin biopsy and performing Epidermal Nerve Fiber Density (ENFD) testing. Diagnosis can be extremely helpful in determining which treatment option is best for a particular patient. Early detection can also be important as detection of reduced small nerve fiber density can predict the progression to a larger-spread neuropathy. An ENFD test can reduce overall healthcare costs, unnecessary surgeries, unnecessary treatments and improve patient care. Once diagnosed and treated, ENFD testing can be utilized to evaluate the course of treatment for patient improvement, and can be adjusted accordingly if necessary. Standard tests for nerve damage such as electromyograms and nerve conduction studies (EMG and NCS) are gross measures of large nerves, but they cannot give the appropriate information on the health of small sensory nerve fibers.
Our proprietary test for Epidermal Nerve Fiber Density (ENFD-IHC) provides an objective diagnosis for small fiber neuropathy. The method requires the highest-level technical skill-set, knowledge, and expertise from laboratorians and pathologists alike. This test is not commercially available because of the unique requirements that can be difficult to implement in a routine laboratory’s workflow. Our talented team of experts developed a method with improved quality, accuracy and turn-around-time.
Ipsum’s proprietary method for ENFD testing was developed using H&E as the background stain, not immunohistochemical (IHC) background stain regularly implemented by other laboratories. Tissue sections are examined for more than just the small nerve fibers. The H&E background better discriminates other abnormalities such as inflammatory cells, vasculitis or a subtle tumor. This comprehensive evaluation ensures the physician has the most information to treat the Small Fiber Neuropathy and any underlying cause. If an abnormality of concern is identified, this can be reported and communicated to the physician. The method developed improves our turn-around-time and does not require additional CPT codes
ENFD
Do you treat patients for peripheral neuropathy?
Do you perform EMGs and Nerve Conduction Studies on patients without conclusive results? Would you like a definitive answer before you proceed with your patient’s treatment process? Epidermal Nerve Fiber Density (ENFD) testing with Ipsum Diagnostics can provide you with the crucial clinical diagnosis you need in order to appropriately treat your patients with SFN.
Why ENFD Testing?
Definitive diagnosis of peripheral neuropathy can be extremely helpful in determining which treatment option is best for a particular patient. Early detection can also be important since detection of reduced small nerve fiber density can predict the progression to a larger-spread neuropathy. An ENFD test can reduce overall healthcare costs, unnecessary surgeries, unnecessary treatments and improve patient care. Standard tests for nerve damage such as electromyograms and nerve conduction studies (EMG and NCV) are gross measures of large nerve fibers, but they do not assess small unmyelinated nerve C fibers, and the thinly myelinated A-Delta fibers.
Additional Tests
For a comprehensive assessment, additional stains can be performed on the same specimens being utilized for the ENFD testing.
• Congo-Red – Determines if an amyloid is detected.
• H&E – Can show evidence of Vasculitis.
Biopsy Procedure
*Do not inject anesthesia into biopsy site, injection should be around the biopsy site and directly below.
- Select area to be biopsied.
- The skin is cleansed with an alcohol swab or povidone-iodine solution and anesthetized with 1-2% lidocaine with epinephrine. A 30-gauge needle is used to administer the anesthetic to limit discomfort.
- The lines of least skin tension should be identified for the area to be biopsied. For example, on the arm, these lines run perpendicular to the long axis of the extremity. The incision line created by the suturing after the biopsy is performed will be oriented parallel to the lines of least skin tension.
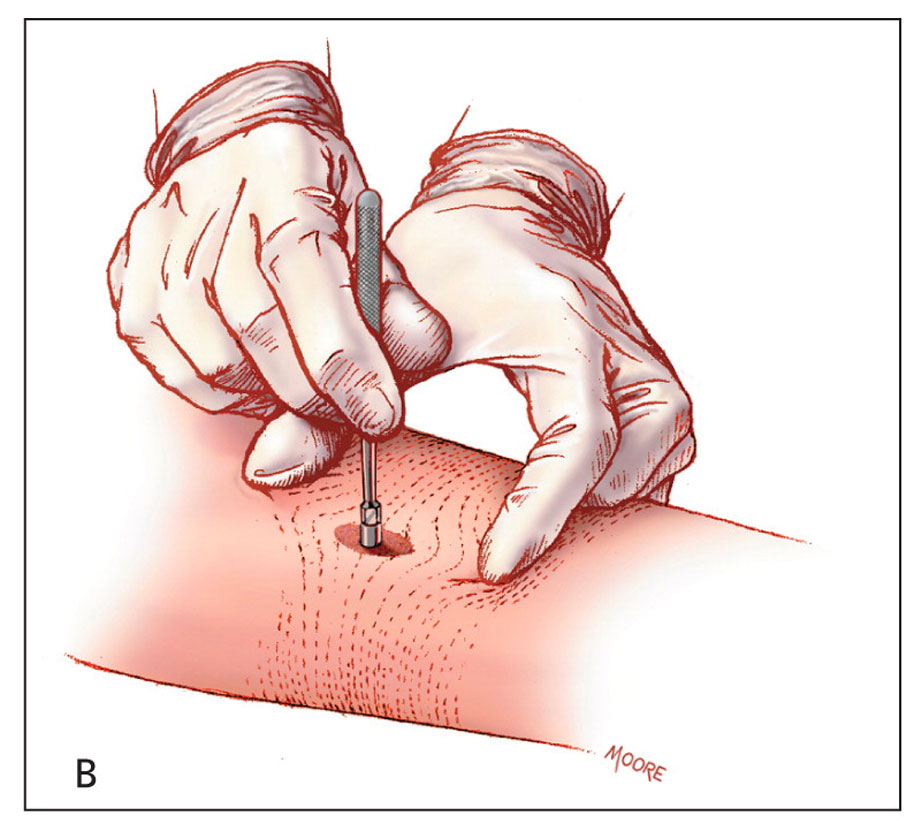
- The skin surrounding the biopsy site is stretched with the thumb and index finger of the non dominant hand. The skin is stretched perpendicular to the lines of least skin tension. When the skin relaxes after the biopsy is performed, an elliptical-shaped wound remains that is oriented in the same direction as the lines of least skin tension.
- The punch biopsy instrument is held vertically over the skin and rotated downward using a twirling motion created by the first two fingers on the dominant hand. Once the instrument has penetrated the dermis into the subcutaneous fat, or once the instrument reaches the hub, it is removed.
- The cylindrical skin specimen is elevated with the provided forceps held in the non-dominant hand. Scissors held in the dominant hand cut the specimen free from the subcutaneous tissues if necessary. The cut is made below the level of the dermis.
- Note about specimen handling: carefully grab only the skin edge of the biopsy specimen as to not crush the tissue. A poorly handled sample can make diagnosis unnecessarily difficult or impossible.
- Place biopsy specimen in the provided formalin container and close securely.
- Once the biopsy has been removed from the skin, use the provided 2 by 2 sterile gauze to stop the initial bleeding. A dab of vasoline, aluminum chloride, or another topical hemostatic agent of your choice may be necessary to stop the bleeding. The biopsy site is then covered with a band-aid, and possibly fortified with gauze and paper tape if the bleeding threatens to soak the band-aid and/or the patient’s clothing. This “hole” in the skin will continue to bleed for the rest of the day and may or may not form a scab in a few days time. This quick procedure does not require stitches.
- The biopsy site should be kept clean. The site should not be submerged in water (i.e. no swimming, hot tubs, baths, etc.) for at least 24 hours. The bandage will need to be changed at least once a day, and should be changed if it should become wet or damp.
- Billing Info The appropriate CPT code for the first biopsy is 11104, and each additional biopsy should be billed with the code 11105.
Biopsy Reference Images


Biopsies can be taken unilaterally or bilaterally.
Calf (A)
10 cm above the lateral malleolus. This is the most common site for the punch biopsy to be taken.
Thigh(B)
A proximal biopsy can be taken closer to the body to show progression of the neuropathy, and determine whether it is length dependent.
Wrist (C)
If patient is presenting with neuropathic symptoms in their upper extremities, a biopsy should be collected approximately 5 cm above the wrist.
Upper Arm (D)
The lateral proximal arm can be taken to show progression of the neuropathy, and determine whether it is length dependent.
Packaging and Shipping Instructions
- Complete requisition form and place in outside pocket of biohazard bag
- Perform 3mm punch biopsy.
- Remove cap from collection tube.
- Using tweezers, place tissue in the tube containing zamboni’s fixative. Make sure to fully submerge the specimen in the fixative. Note: tubes containing zamboni’s fixative can be stored at room temperature or refrigerated until specimen is collected.
- Tightly replace cap on tube.
- Write patient name, DOB, and biopsy site on the label.
- Place label on the collection tube.
- Put specimen tube in biohazard bag.
- Immediately place biohazard bag with specimen and requisition form in the refrigerator or in Kangaroo Mailer Pouch with frozen freezer pack for immediate shipping.**
- Seal the mailer pouch. Using a pen or scissors, puncture the mailer where indicated.
- Place the sealed mailer into the provided UPS Laboratory Pak, and place the shipping label on the Lab Pak. If sample will be delivered on a Saturday, affix the Saturday Delivery sticker to the Lab Pak as well.
**Once specimen is in zamboni’s fixative, it must immediately put in the refrigerator or in an insulated mailer on ice. Overnight shipping is required to keep the specimen viable for testing.
Please schedule a UPS pickup with your representative prior to, or as early as possible the day of specimen collection. Friday shipments must be arranged directly with Ipsum Diagnostics as these require a special “Saturday Delivery” label.
To schedule a pickup please email us at this address: shipping@ipsumdiagnostics.com
Shipping phone number: 256-963-9385 (If you are within 5 hours of the pickup time request, we need you to call this number)
BILLING CODES
When billing for punch biopsies for Epidermal Nerve Fiber Density Testing it is appropriate to bill code 11104 for the first biopsy and 11105 for each additional biopsy that you perform on the patient. It is billed as a procedure, so be aware that certain insurances may not allow a procedure to be added onto an office visit on that same date (please consult your insurance providers to verify). However, you can add it on to another procedure with a 59 modifier if one happens to be performed on that same date.
Please contact Colin Rogers with any questions: 404-441-8180
PATIENT INSTRUCTIONS FOR BIOPSY SITE CARE
1. Leave your wound dressings in place for the rest of the day of the biopsy and keep them dry.
2. Change band-aids daily starting the day after the biopsy.
3. Showers are fine starting the day after the biopsy. Leave the band-aids in place while you shower and change them after you dry off.
4. During the time period of daily band-aid changes, do not soak in a bath or swim.5. The average time for daily band-aid changes is 5 to 6 days (range is from 1 or 2 days up to 2 weeks).
6. If you need to use anything to clean the wounds, hydrogen peroxide is recommended. If the wounds are fine (i.e., no signs of infection), all that is required is a daily band-aid change.
7. The wounds may or may not form a scab as they heal; either way is fine.
8. Continue to change the band-aids daily until there are no open wounds.
9. The local anesthetic used for the biopsy will usually last for 1 to 2 hours after the procedure. After it wears off, you may have some mild, localized soreness and tenderness at the biopsy sites over the next day or two. You may find regular Tylenol is helpful for the discomfort.
10. Refrain from doing extremely strenuous activity for the rest of the day of your biopsy (such as running or heavy lifting).
11. Once you are without the band-aid, the biopsy sites may look slightly red or darker than the rest of your skin. This discoloration will gradually fade and blend back with your normal skin color. This fading process may take anywhere from a few months up to a year.
12. It is very rare for people to have any problems during the healing period. It is normal for the biopsy sites to bleed a little bit or drain pink fluid for a day or two after the biopsies.They should not bleed excessively (i.e., through the band-aid) after that time. They should never drain pus. If you do experience problems with significant bleeding, redness, infection, or other problems, call your doctor’s office.
Source: Click Here